

Your cart is currently empty!

DIY – Brake Pad Replacement Guide
Keeping your brakes in top condition is essential for safe driving. Worn brake pads can lead to decreased stopping power and even complete brake failure. Fortunately, replacing brake pads is a DIY project that can be tackled at home with the right tools and knowledge.
This guide will walk you through the process of replacing your brake pads, step-by-step.
What You’ll Need
- Safety glasses
- Work gloves
- Lug wrench
- Jack and jack stands
- Socket wrench set
- C-clamp or brake piston compressor tool (optional)
- Brake pad replacement kit (specific to your car model)
- Brake cleaner (optional)
- Anti-seize lubricant
Before You Begin
Park your car on a flat, level surface and engage the parking brake.
Consult your car’s manual for specific instructions and torque specifications.
It’s recommended to replace brake pads in pairs (both front wheels or both rear wheels at the same time).
Step-by-Step Guide
1. Loosen the Lug Nuts
While the wheels are still on the ground, loosen the lug nuts on the wheels you’ll be working on (usually one axle at a time) with the lug wrench. Don’t remove them completely yet.

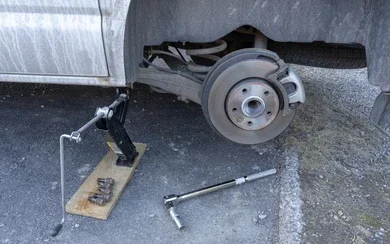
2. Raise the Car and Secure it Safely
Use the jack to raise the car until the tire you’re working on is off the ground. Place a jack stand under the designated frame point for your car (refer to your car’s manual) and carefully lower the car onto the jack stand. Repeat for the other wheel.
3. Remove the Wheel
Now that the car is safely supported, remove the lug nuts completely and take off the wheel.
4. Inspect the Caliper and Brake Pads
Look at the brake caliper and surrounding components for any leaks, cracks, or excessive wear. You can use brake cleaner (optional) to clean the area for better inspection.
5. Remove the Caliper Bracket Bolts
There are usually two bolts holding the caliper bracket in place. Remove these bolts with your socket wrench set.

6. Support the Caliper
Carefully swing the caliper bracket up and away from the rotor, be mindful of the brake line and don’t let it strain. You can use a zip tie or wire to hang the caliper from a secure spot.
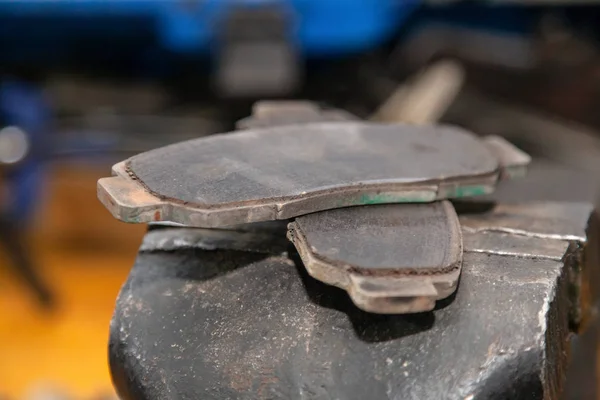
7. Remove the Old Brake Pads
There may be retaining clips holding the brake pads in place. These can be removed with needle-nose pliers if necessary. Then, simply pull out the old brake pads.
8. (Optional) Clean and Lubricate the Caliper Bracket Slide Pins
These pins allow the caliper to slide freely. You can clean and apply a thin coat of anti-seize lubricant according to your car’s manual.
9. Compress the Brake Piston (Optional)
New brake pads are thicker than old ones, so you might need to compress the caliper piston to create space for them. This can be done with a C-clamp and a brake pad (from the old set) or a dedicated brake piston compressor tool.
Warning: Apply pressure slowly and evenly to avoid damaging the piston or caliper.
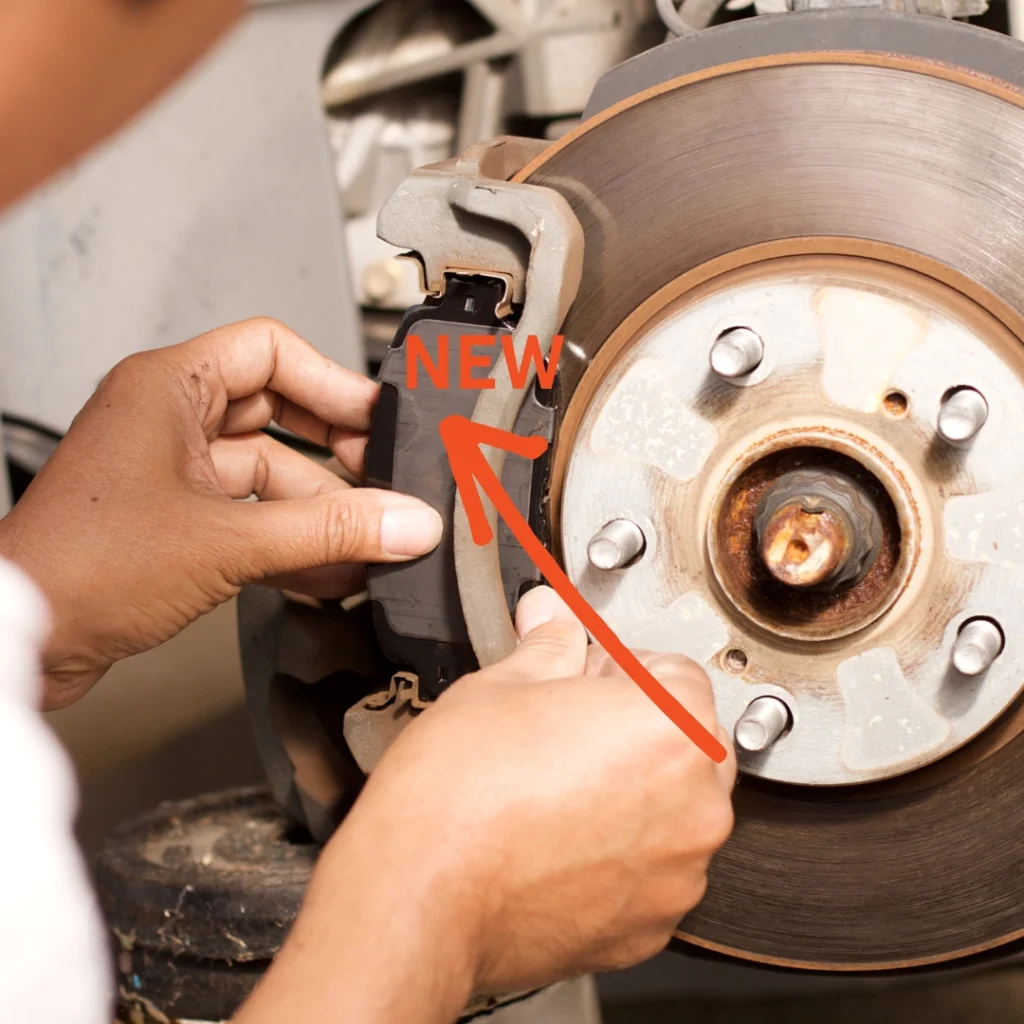
10. Install the New Brake Pads
Slide the new brake pads into the caliper bracket, following the orientation as shown on the new pads. Re-insert any retaining clips if needed.

11. Reinstall the Caliper Bracket and Bolts
Carefully put the caliper bracket back in place and tighten the bolts to the torque specification mentioned in your car’s manual.
12. Reinstall the Wheel and Lower the Car
Put the wheel back on and screw the lug nuts on finger tight. Lower the car using the jack and remove the jack stand. Once the car is back on the ground, tighten the lug nuts in a star pattern with the lug wrench.
13. Repeat for the Other Side
Repeat steps 1-12 for the other wheel.
14. Pump the Brakes
Once both sides are done, get back in the car and slowly and firmly press the brake pedal several times to pump up the brakes. The pedal feel should become firmer with each press.
15. Check Brake Fluid Level Inspect the brake fluid reservoir under the hood. Replacing brake pads may cause the fluid level to rise slightly
DIY – Brake Pad Replacement Guide
Keeping your brakes in top condition is essential for safe driving. Worn brake pads can lead to decreased stopping power and even complete brake failure. Fortunately, replacing brake pads is a DIY project that can be tackled at home with the right tools and knowledge.
This guide will walk you through the process of replacing your brake pads, step-by-step.
What You’ll Need
- Safety glasses
- Work gloves
- Lug wrench
- Jack and jack stands
- Socket wrench set
- C-clamp or brake piston compressor tool (optional)
- Brake pad replacement kit (specific to your car model)
- Brake cleaner (optional)
- Anti-seize lubricant
Before You Begin
Park your car on a flat, level surface and engage the parking brake.
Consult your car’s manual for specific instructions and torque specifications.
It’s recommended to replace brake pads in pairs (both front wheels or both rear wheels at the same time).
Step-by-Step Guide
1. Loosen the Lug Nuts
While the wheels are still on the ground, loosen the lug nuts on the wheels you’ll be working on (usually one axle at a time) with the lug wrench. Don’t remove them completely yet.
2. Raise the Car and Secure it Safely
Use the jack to raise the car until the tire you’re working on is off the ground. Place a jack stand under the designated frame point for your car (refer to your car’s manual) and carefully lower the car onto the jack stand. Repeat for the other wheel.
3. Remove the Wheel
Now that the car is safely supported, remove the lug nuts completely and take off the wheel.
4. Inspect the Caliper and Brake Pads
Look at the brake caliper and surrounding components for any leaks, cracks, or excessive wear. You can use brake cleaner (optional) to clean the area for better inspection.
5. Remove the Caliper Bracket Bolts
There are usually two bolts holding the caliper bracket in place. Remove these bolts with your socket wrench set.
6. Support the Caliper
Carefully swing the caliper bracket up and away from the rotor, be mindful of the brake line and don’t let it strain. You can use a zip tie or wire to hang the caliper from a secure spot.
7. Remove the Old Brake Pads
There may be retaining clips holding the brake pads in place. These can be removed with needle-nose pliers if necessary. Then, simply pull out the old brake pads.
8. (Optional) Clean and Lubricate the Caliper Bracket Slide Pins
These pins allow the caliper to slide freely. You can clean and apply a thin coat of anti-seize lubricant according to your car’s manual.
9. Compress the Brake Piston (Optional)
New brake pads are thicker than old ones, so you might need to compress the caliper piston to create space for them. This can be done with a C-clamp and a brake pad (from the old set) or a dedicated brake piston compressor tool.
Warning: Apply pressure slowly and evenly to avoid damaging the piston or caliper.
10. Install the New Brake Pads
Slide the new brake pads into the caliper bracket, following the orientation as shown on the new pads. Re-insert any retaining clips if needed.
11. Reinstall the Caliper Bracket and Bolts
Carefully put the caliper bracket back in place and tighten the bolts to the torque specification mentioned in your car’s manual.
12. Reinstall the Wheel and Lower the Car
Put the wheel back on and screw the lug nuts on finger tight. Lower the car using the jack and remove the jack stand. Once the car is back on the ground, tighten the lug nuts in a star pattern with the lug wrench.
13. Repeat for the Other Side
Repeat steps 1-12 for the other wheel.
14. Pump the Brakes
Once both sides are done, get back in the car and slowly and firmly press the brake pedal several times to pump up the brakes. The pedal feel should become firmer with each press.
15. Check Brake Fluid Level Inspect the brake fluid reservoir under the hood. Replacing brake pads may cause the fluid level to rise slightly
Search
Popular Posts
-
DIY – Brake Pad Replacement Guide
Keeping your brakes in top condition is essential for safe driving. Worn brake pads can lead to decreased stopping power and even complete brake failure. Fortunately, replacing brake pads is a DIY project that can be tackled at home with the right tools and knowledge. This guide will walk you through the process of replacing…
-
The Secret Language of Your Car: Essential Vehicle Sensors
Modern cars are marvels of engineering, packed with technology that keeps us safe, comfortable, and informed. But behind the scenes, a network of silent spies gathers information – vehicle sensors. These unsung heroes play a critical role in every aspect of your car’s operation. Let’s delve into the world of vehicle sensors and explore their…
-
Welcome!
Welcome to CitiLink Auto Parts.
Categories
Archives
Tags
There’s no content to show here yet.

Leave a Reply